You had your eye on it for a while, saved up some money and now its time. You got your new Humminbird Helix for ice fishing! Going through the settings can get a little confusing, so hopefully, after reading this you’ll have a little better understanding and have your Helix set up for ice fishing.
amzn_assoc_tracking_id = “scottschuchard-20”;
amzn_assoc_ad_mode = “manual”;
amzn_assoc_ad_type = “smart”;
amzn_assoc_marketplace = “amazon”;
amzn_assoc_region = “US”;
amzn_assoc_design = “enhanced_links”;
amzn_assoc_asins = “B07Y29CDML”;
amzn_assoc_placement = “adunit”;
amzn_assoc_linkid = “056ce21dadc3478b6bbfece3a2c0c734”;
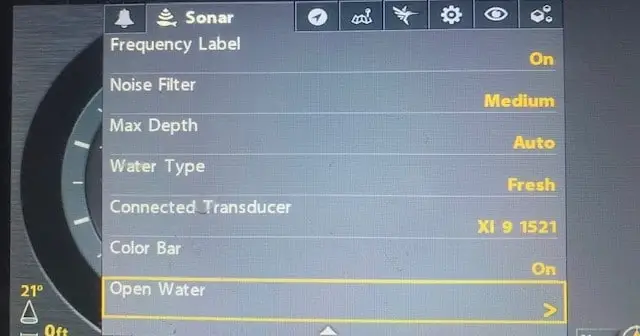
The first thing you wanna do when you fire up for the first time is to make sure you are in ICE FISHING MODE. For that just hit Menu two times, on the left side move over to SONAR. Scroll down to the bottom and find where it will either say “ICE FISHING” or “OPEN WATER”. You want this to say “OPEN WATER” (kinda confusing I know). If it says “ICE FISHING” there will be a little arrow pointing left, hit your left button. A Confirm screen will pop up saying the unit will restart. Hit Yes.
After your Humminbird Helix is in ice fishing mode, you’ll want to make a few adjustments. Most of these can be made at home, you will want to fine-tune once your out on the ice.
HUMMINBIRD HELIX GAIN SETUP
For this, hit your View button until you just have your “flasher mode” all these settings will carry over to your other views.
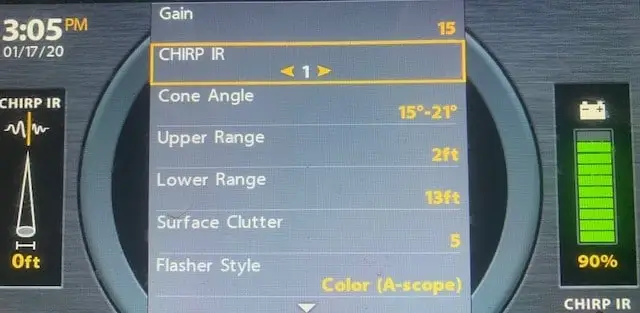
Hit Menu one time. The top setting is Gain. Your gain adjusts your “sensitivity” for smaller profile jigs you may need to increase your gain to get a stronger return. For bigger profile jigs, you can decrease your gain. This will need to be adjusted while on the water. This is really no different than traditional fish finders for ice fishing.
CHIRP IR
If you are fishing near other ice units you may need to adjust your IR (interference rejection) Settings 1,3 and 5 are going to be your narrower cone. 2,4, and 6 will be your wider cone.
The narrow cone angle is better if you’re set up on a drop-off or fishing deep.
The wider cone angle is better if you’re set up on a flat bottom or fishing shallow.
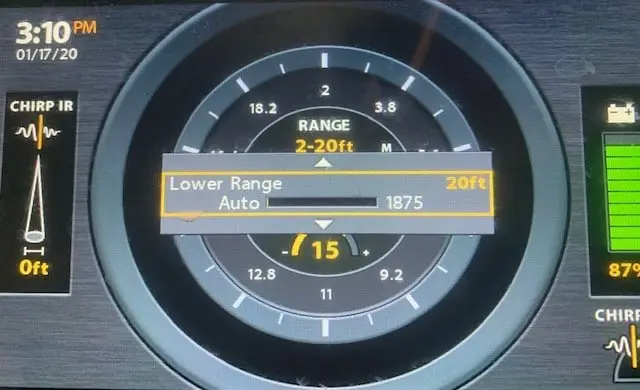
LOWER RANGE
This is a feature that I feel people don’t take full advantage of. Let’s say you’re fishing in 18 feet of water, set your “Lower Range” to 20ft. This will help you get the most usage out of your dial. This puts 20′ at the top and allows for the whole dial used. I always set mine 2-3 feet deeper than what depth I’m fishing in.
If you set your “Lower Range” to Auto as your transducers move or swings around it will cause your bottom to bounce around.
SURFACE CLUTTER
I don’t mess around with this a whole lot. I will typically run mine on either setting 5 or 6. It seems to be right to keep the screen clean and still allowing your smaller jigs to show up without cranking your gain up.
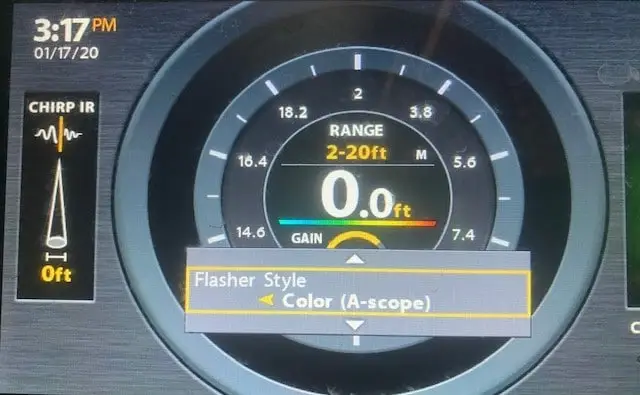
FLASHER STYLE
This is a personal preference. There are two options for this either “Full” or “A Scope”. Full (traditional) will have the bar from either your fish or lure extend to the edge of the dial. A scope will turn it into smaller marks and won’t expand to the edge of the dial. The A-scope is the setting I run and here’s why. With the smaller mark of my jig, it’s a lot easier to tell if a fish is still on my lure or it has moved off. If your jig is taking up the whole width of the dial there is a good chance there is still a fish on you.
SONAR COLORS
This again is a personal preference. I run mine on number 8, but there are 22 options for this so play around with it and see what you like best. There is anything from traditional flasher colors to some with 8 colors involved. Some people will go for darker colors and some with lighter colors. I find it easier to read with the darker colors, especially if I’m out hole hopping.
Next, I’ll go over a couple of other settings when using the graph mode. I’d say 98% of the time I’m running the dual-screen. On one side is the flasher, the other side has the graph.
Hit your view button until you get to the split-screen. Hit menu one time. On the top of the box, it will allow you to change between left and right active pain switch over to the left-hand side to get the options for the graph mode.
amzn_assoc_tracking_id = “scottschuchard-20”;
amzn_assoc_ad_mode = “manual”;
amzn_assoc_ad_type = “smart”;
amzn_assoc_marketplace = “amazon”;
amzn_assoc_region = “US”;
amzn_assoc_design = “enhanced_links”;
amzn_assoc_asins = “B07D1Q1PDQ”;
amzn_assoc_placement = “adunit”;
amzn_assoc_linkid = “ec03287f7545e8c98f4871a6067d6f9f”;
HUMMINBIRD HELIX CHART SPEED
For this, I like to crank the speed all the way up. it will help with any delay and give you a real-time outcome.

SAVE YOUR BATTERY
I know a lot of people complain that the Humminbird Helix will burn up your battery fast. An easy fix for this is to turn the brightness down. To do this, simply tap the power button, and a menu will come up that includes the brightness. Turn it down to your liking, and that will save a heck of a lot of battery juice.
That is about it, you’re all set up with your Humminbird Helix for ice fishing. I’ve been running my unit for the last couple winters and love it. Just like any other flasher, there is a bit of a learning curve to using the unit but once you get it dialed in and use it for a while out on the lake it becomes a very vital piece of equipment. I hope this helped a little on setting up your Helix and getting out on the ice.
If you have any questions on using or setting up your Helix, comment below or on our social media pages and we will gladly help answer any of your questions.
Good luck this winter.